|
|
||
|---|---|---|
| .vite/deps | ||
| backend | ||
| doc | ||
| frontend | ||
| scripts | ||
| wokwi-libs | ||
| .gitignore | ||
| ARCHITECTURE.md | ||
| CLAUDE.md | ||
| README.md | ||
| SETUP_COMPLETE.md | ||
| WOKWI_LIBS.md | ||
| fancy-splashing-shannon.md | ||
| package-lock.json | ||
| package.json | ||
| start-backend.bat | ||
| start-frontend.bat | ||
| update-wokwi-libs.bat | ||
README.md
OpenWokwi - Arduino Emulator
A fully local, open-source Arduino emulator inspired by Wokwi. Write Arduino code, compile it, and simulate it with real AVR8 CPU emulation and 48+ interactive electronic components — all running in your browser.
Support This Project
If you find this project helpful, please consider giving it a star! Your support helps the project grow and motivates continued development.

Every star counts and helps make this project better!
Screenshots
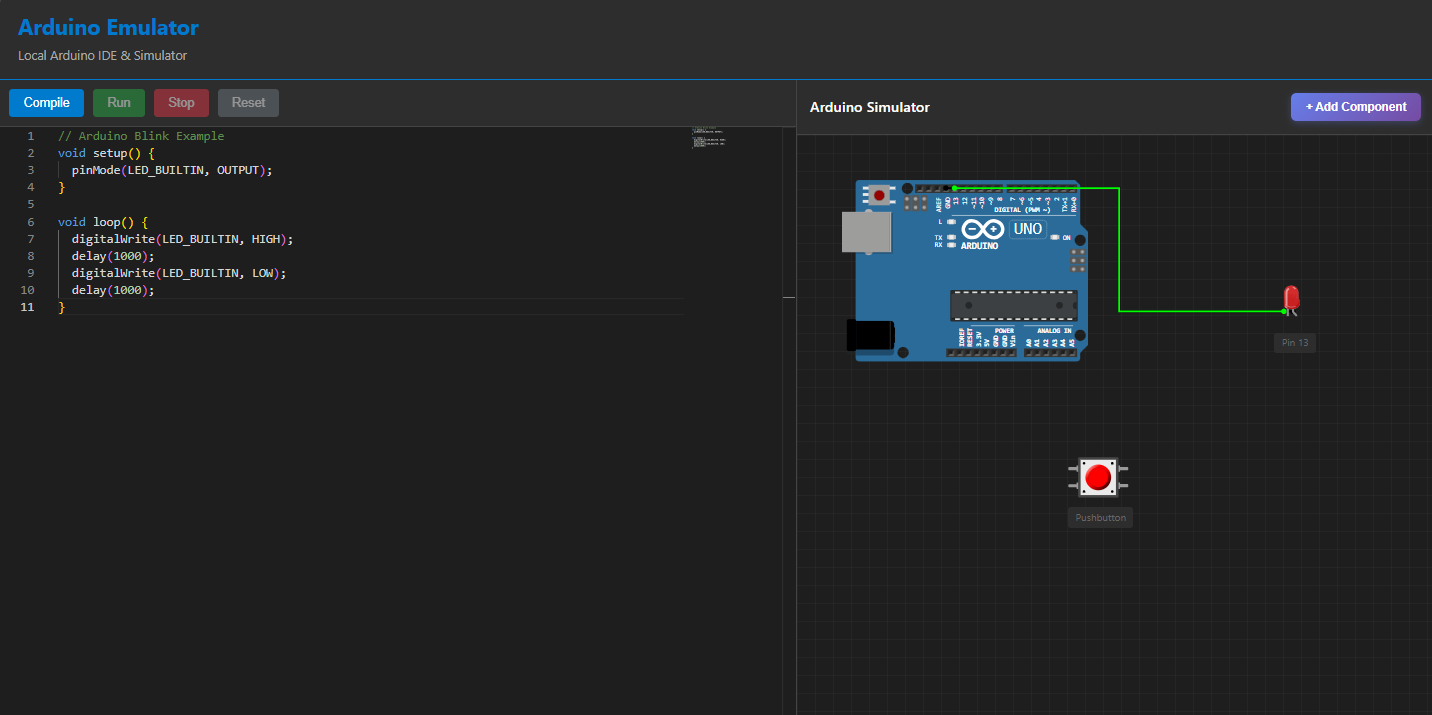
Arduino emulator with Monaco code editor and visual simulator with wokwi-elements

Interactive component properties dialog and segment-based wire editing
Features
Code Editing
- ✅ Monaco Editor — Full C++ editor with syntax highlighting, autocomplete, minimap, and dark theme
- ✅ Arduino compilation via
arduino-clibackend — compile sketches to.hexfiles - ✅ Compile / Run / Stop / Reset toolbar buttons with status messages
AVR8 Simulation (avr8js)
- ✅ Real ATmega328p emulation at 16 MHz using avr8js
- ✅ Intel HEX parser with checksum verification
- ✅ Full GPIO support — PORTB (pins 8-13), PORTC (A0-A5), PORTD (pins 0-7)
- ✅ Timer0 peripheral support
- ✅ USART (Serial) support
- ✅ ~60 FPS simulation loop with
requestAnimationFrame(~267k cycles/frame) - ✅ Speed control — adjustable from 0.1x to 10x
- ✅ Single-step debugging API
- ✅ External pin state injection for input components (buttons, potentiometers)
Component System (48+ Components)
- ✅ 48 electronic components auto-discovered from wokwi-elements source code
- ✅ Component picker modal with search bar, category filtering, and live wokwi-element previews as thumbnails
- ✅ 9 component categories: Boards (4), Sensors (6), Displays (3), Input (5), Output (5), Motors (2), Passive (4), Other (19)
- ✅ Dynamic component rendering from build-time metadata (TypeScript AST parser extracts
@customElementtags,@propertydecorators, and pin counts) - ✅ Drag-and-drop repositioning on the simulation canvas
- ✅ Component rotation in 90° increments
- ✅ Property dialog (single-click) — shows pin roles, Arduino pin assignment, rotate & delete actions
- ✅ Pin selector (double-click) — assign Arduino pins D0-D13 and A0-A5 to component pins
- ✅ Pin overlay system — clickable cyan dots on each component pin with hover animation
- ✅ Keyboard shortcuts — Delete/Backspace to remove, Escape to cancel
Part Simulation Behaviors
- ✅ LED — pin state drives LED on/off
- ✅ RGB LED — digital HIGH/LOW mapped to individual R/G/B channels
- ✅ Pushbutton — press/release events inject active-LOW pin state into simulation
- ✅ Potentiometer — reads element value (0-1023), converts to voltage, injects into ADC channel
- ✅ LCD 1602 & LCD 2004 — Full HD44780 controller emulation:
- 4-bit mode protocol (high nibble first, then low nibble)
- DDRAM with proper line address mapping
- Commands: Clear Display, Return Home, Entry Mode Set, Display On/Off, Cursor/Display Shift, Function Set
- Initialization sequence handling
- Enable pin falling-edge detection for data latching
Wire System
- ✅ Wire creation — click a pin to start, click another pin to connect
- ✅ Real-time preview — dashed green wire with L-shaped orthogonal routing while creating
- ✅ Orthogonal wire rendering — no diagonal paths
- ✅ Segment-based wire editing — hover to highlight, drag segments perpendicular to their orientation
- ✅ Smooth dragging with
requestAnimationFrame - ✅ 8 signal-type wire colors: Red (VCC), Black (GND), Blue (Analog), Green (Digital), Purple (PWM), Gold (I2C), Orange (SPI), Cyan (USART)
- ✅ Automatic overlap offset — parallel wires are offset symmetrically (6px spacing)
- ✅ Auto-update positions — wire endpoints recalculate when components move
- ✅ Grid snapping (20px grid)
Example Projects
- ✅ 8 built-in example projects with full code, components, and wire definitions:
| Example | Category | Difficulty |
|---|---|---|
| Blink LED | Basics | Beginner |
| Traffic Light | Basics | Beginner |
| Button Control | Basics | Beginner |
| Fade LED (PWM) | Basics | Beginner |
| Serial Hello World | Communication | Beginner |
| RGB LED Colors | Basics | Intermediate |
| Simon Says Game | Games | Advanced |
| LCD 20x4 Display | Displays | Intermediate |
- ✅ Examples gallery with category and difficulty filters
- ✅ One-click loading — loads code, components, and wires into the editor and simulator
Wokwi Libraries (Local Clones)
- ✅ wokwi-elements — 48+ electronic web components (Lit-based Web Components)
- ✅ avr8js — AVR8 CPU emulator
- ✅ rp2040js — RP2040 emulator (cloned, for future use)
- ✅ Build-time metadata generation — TypeScript AST parser reads wokwi-elements source to generate component metadata automatically
Prerequisites
1. Node.js
- Version 18 or higher
- Download from: https://nodejs.org/
2. Python
- Version 3.12 or higher
- Download from: https://www.python.org/
3. Arduino CLI
Install arduino-cli on your system:
Windows (with Chocolatey):
choco install arduino-cli
Windows (manual):
- Download from: https://github.com/arduino/arduino-cli/releases
- Add to system PATH
Verify installation:
arduino-cli version
Initialize arduino-cli:
arduino-cli core update-index
arduino-cli core install arduino:avr
Installation
1. Clone the repository
git clone https://github.com/davidmonterocrespo24/openwokwi.git
cd openwokwi
2. Setup Backend
cd backend

# Create virtual environment
python -m venv venv

# Activate virtual environment (Windows)
venv\Scripts\activate

# Install dependencies
pip install -r requirements.txt
3. Setup Frontend
cd frontend

# Install dependencies
npm install
Running
Start Backend
cd backend
venv\Scripts\activate
uvicorn app.main:app --reload --port 8001
The backend will be available at:
- API: http://localhost:8001
- Documentation: http://localhost:8001/docs
Start Frontend
cd frontend
npm run dev
The frontend will be available at:
Usage
- Open http://localhost:5173 in your browser
- Write Arduino code in the editor (a Blink example is loaded by default)
- Click Compile to compile the code via the backend
- Click Run to start real AVR8 CPU simulation
- Watch LEDs, LCDs, and other components react in real time
- Click on components to view properties or assign pin mappings
- Double-click components to open the pin selector
- Click pins to create wires connecting components
- Browse Examples to load pre-built projects (Blink, Traffic Light, Simon Says, LCD, etc.)
Project Structure
openwokwi/
├── frontend/                       # React + Vite + TypeScript
│   ├── src/
│   │   ├── components/
│   │   │   ├── ComponentPickerModal.tsx  # Component search & picker
│   │   │   ├── DynamicComponent.tsx      # Generic wokwi component renderer
│   │   │   ├── components-wokwi/         # Legacy React wrappers
│   │   │   ├── editor/                   # Monaco Editor + toolbar
│   │   │   ├── examples/                 # Examples gallery
│   │   │   └── simulator/               # Canvas, wires, pins, dialogs
│   │   ├── simulation/
│   │   │   ├── AVRSimulator.ts           # AVR8 CPU emulator wrapper
│   │   │   ├── PinManager.ts             # Pin-to-component mapping
│   │   │   └── parts/                    # Part behaviors (LED, LCD, etc.)
│   │   ├── store/                        # Zustand state management
│   │   ├── services/                     # API clients & ComponentRegistry
│   │   ├── types/                        # TypeScript types (wires, components)
│   │   ├── utils/                        # Hex parser, wire routing, pin calc
│   │   └── pages/                        # EditorPage, ExamplesPage
│   └── public/
│       └── components-metadata.json      # Auto-generated component metadata
│
├── backend/                        # FastAPI + Python
│   └── app/
│       ├── main.py                       # Entry point, CORS config
│       ├── api/routes/compile.py         # POST /api/compile, GET /api/compile/boards
│       └── services/arduino_cli.py       # arduino-cli subprocess wrapper
│
├── wokwi-libs/                     # Cloned Wokwi repositories
│   ├── wokwi-elements/                  # 48+ Web Components (Lit)
│   ├── avr8js/                           # AVR8 CPU Emulator
│   ├── rp2040js/                         # RP2040 Emulator (future)
│   └── wokwi-features/                  # Features and documentation
│
├── scripts/
│   └── generate-component-metadata.ts    # AST parser for component discovery
│
├── ARCHITECTURE.md                 # Detailed architecture documentation
├── WOKWI_LIBS.md                   # Wokwi integration documentation
└── update-wokwi-libs.bat           # Update local Wokwi libraries
Technologies Used
Frontend
- React 19 — UI framework
- Vite 7 — Build tool with local library aliases
- TypeScript 5.9 — Static typing
- Monaco Editor — Code editor (VS Code engine)
- Zustand 5 — State management
- React Router 7 — Client-side routing
- Axios — HTTP client
Backend
- FastAPI — Python web framework
- uvicorn — ASGI server
- arduino-cli — Arduino compiler (subprocess)
Simulation & Components
- avr8js — Real AVR8 ATmega328p emulator (local clone)
- wokwi-elements — 48+ electronic web components built with Lit (local clone)
- rp2040js — RP2040 emulator (local clone, for future use)
Planned Features
- 📋 Serial Monitor — UI for reading USART output from the simulation
- 📋 Project Persistence — Save/load projects with SQLite
- 📋 Undo/Redo — Edit history for code and circuit changes
- 📋 Multi-board Support — Runtime board switching (Mega, Nano, ESP32)
- 📋 Wire Validation — Electrical validation and error highlighting
- 📋 Export/Import — Share projects as files
Update Wokwi Libraries
This project uses official Wokwi repositories cloned locally. To get the latest updates:
# Run update script
update-wokwi-libs.bat
Or manually:
cd wokwi-libs/wokwi-elements
git pull origin main
npm install
npm run build
See WOKWI_LIBS.md for more details about Wokwi integration.
Troubleshooting
Error: "arduino-cli: command not found"
- Make sure arduino-cli is installed and in PATH
- Verify with:
arduino-cli version
Error: "arduino:avr core not found"
- Run:
arduino-cli core install arduino:avr
Frontend doesn't connect to backend
- Verify backend is running at http://localhost:8001
- Check CORS logs in browser console
Compilation errors
- Check backend console for arduino-cli logs
- Make sure Arduino code is valid
- Verify you have the
arduino:avrcore installed
LED doesn't blink
- Check port listeners are firing (browser console logs)
- Verify pin mapping in the component property dialog
CPU stuck at PC=0
- Ensure
avrInstruction()is being called in the execution loop - Check hex file was loaded correctly
Contributing
This is an open-source project. Suggestions, bug reports, and pull requests are welcome!
License
MIT
References
- Wokwi — Project inspiration
- avr8js — AVR8 emulator
- wokwi-elements — Electronic web components
- arduino-cli — Arduino compiler
- Monaco Editor — Code editor